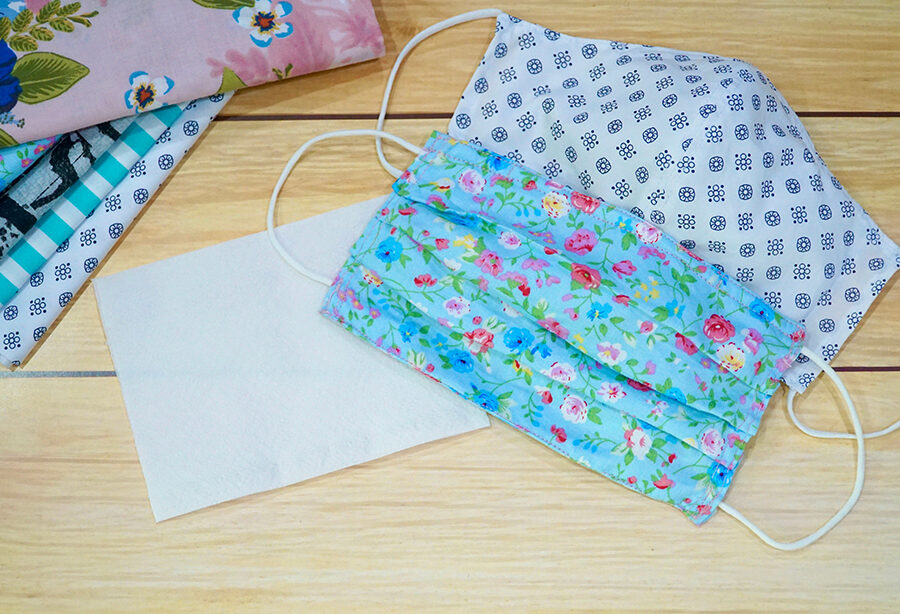
Bethesda is now accepting donations of homemade face masks to help supplement limited quantities of these items currently available from healthcare materials suppliers due to the COVID-19 public health crisis.
These masks are for our residents, as our staff continues to use a limited supply of Personal Protective Equipment (PPE) received from our medical equipment suppliers.
There are some specific requirements in fabrication of these masks (detailed below) for us to be able to accept and utilize your donation.
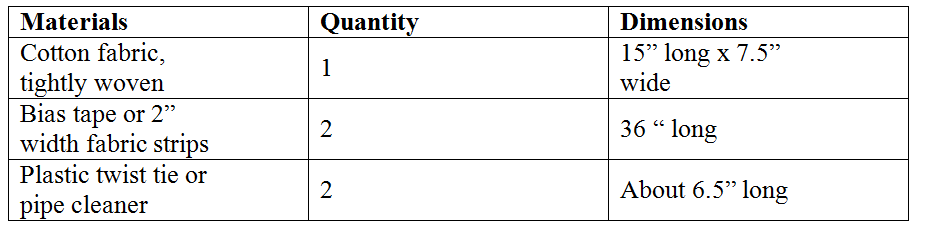
Mask patterns must be followed by using the directions below, or you can visit this tutorial video. All homemade masks must be made of 2 layers of tightly woven cotton, and include a built-in pocket in which a filter can be placed should that extra coverage be needed by the wearer.
Donations can be sent to The Bethesda Health Group Foundation. Please include your name and contact information with the donation. For more information or questions, please contact Pam Dempski, Corporate Vice President and Director of Fund Development at (314) 800-1981 or pedempski@bethesdahealth.org.
Bethesda Health GroupAttn: Pam Dempski1630 Des Peres Road, Suite 290St. Louis, MO 63131-1800
Bethesda appreciates your commitment to the continued safety of our residents and healthcare team.
Requirements
Prewash cotton before you start to sew. Fabric must be tight weaved and color-fast soit will not be bleed when washed in hot water. The nosepiece stay is going to be a garbage bag tie, and it can be stitched in place tutorial video.
Directions
Step 1: Serge or zigzag the short edges of your rectangle.
Step 2: Fold your fabric right sides together, matching the short (serge) edges.
Step 3: Mark 1.5” in from each unfinished side.
Step 4: Stitch along your finished edges with ⅜” seam allowance to the mark, reversingat the beginning and end of your seam. Press your seam allowance open.
Step 5: Topstitch one edge of your seam allowance, ⅛” from the fold.
Step 6: Mark ½” above the unstitched side of your seam allowance. Fold your mask atthat mark. Press flat. Topstitch around the entire mask, ⅛” from the edge.
Step 7: Insert your twist tie into the top of the mask, above the unfinished pocket edge.Stitch along the top edge of the pocket opening, enclosing the twist tie.
Step 8: Fold three ¾” pleats along your mask (so the pleats face down on the front of themask). Press. Run a basting stitch along the edge of the mask to hold the pleats.
For bias tape or fabric strips
Step 9: Lay your bias tape or 2” fabric strip right sides together along the edge of themask. Leave 12” of bias tape hanging below the mask and the rest of the excessabove the mask. Stitch in place with a ⅜” seam allowance.
Step 10: Fold the raw edge of your bias tape to meet the raw edge of your mask. Foldagain so the folded edges meet along the ties, and covers your previous stitchingon the mask. Topstitch in place down the entire length of the bias tape (36”).
For elastic ear loops

Step 9: Lay your bias tape or 2” fabric strip right sides together along the edge of themask. Leave ½” above and cut excess to have ½” overhang below the mask.Fold the ½” overhang to the back side of the mask on top and bottom. Stitch inplace with a ⅜” seam allowance.
Step 10: Fold the raw edge of your bias tape to meet the raw edge of your mask. Foldagain so the folded edge covers your previous stitching. Topstitch in place.
Step 11: Insert your elastic through the channel formed by the bias tape. Tie ends andtuck knot inside bias tape channel.
If you prefer to make a donation to Bethesda’s Readiness Fund click here.
Your donation, commitment and generosity on behalf of Bethesda, is deeply appreciated and will have a tremendous impact. Thank you!
Want to find out more?
If you’d like to stay up to date with Bethesda Health Group, sign up here to receive our blog and newsletters!
"*" indicates required fields


Want to find out more?
If you’d like to stay up to date with Bethesda Health Group, sign up here to receive our blog and newsletters!
"*" indicates required fields